Tool Auctions
- Read Time: 2 mins
- Hits: 9826
Tool auctions are a great place to get deals on tools ... BUT you need to know what you are looking at. You can also buy yourself a peck of to trouble and expense by purchasing faulty tools and not knowing how to test or check them before you buy them ... but, having said that, there are still bargins galore at tool auctions.
At woodworkweb we were recently granted permission to video tape both the tools during viewing time and some of the bidding during a large tool auction. We found that anyone who could use the industrial power tools that were going on the auction block, were getting some great deals. The more obscure the power tool, the better the price. Power tools such as jointers and table saws tend to hold their value a bit better because they are so widely used. Something like a horizontal belt sander or even a mid-sized stroke sander, neither of which are in tremendouse demand, tend get pricing numbers a bit lower.
If you are looking for tools and you are satisfied with used tools that might need sharpening, adjusting or even some minor repairs, tool auctions are the place for you, so sit back and see what kinds of tools and machinery you might find at a typical tool auction ....
Table Saw Push Sticks: What to Keep What Pitch
- Read Time: 3 mins
- Hits: 19318
 Safety with power tools is boring but vital topic and there's not a lot that can make it interesting. I have always been paranoid about loosing digits or parts of digits and to date - after 50 years of woodworking I still have all of them intact, and I intend to keep it that way.
RULE #1 - STOP, LOOK and PLAN. I never attempt any cuts with the table saw that I even think will land me in trouble. If I have any hesitation about making a cut, I look for an alternative method or a safer way of doing things.
In the past generation when power tools started to become popular, the pioneers in power tool woodworking lost fingers and parts of fingers because they were not aware of safety procedures and in many cases there were not the safety shields on machinery that there are now. They taught us that safety IS important.
Part of the problem today, is that many manufacturers that produce inexpensive table saws are, in many cases, unable to manufacture things like blade guards, slitters, riving knives that are truly safe. And what I mean by that, is once you get some of this equipment home and set put it all together, the problem is that some of the safety equipment is so crappy that you need to take it OFF the machine to make the machine safer, because wood is getting caught in and under there supposed safety features and in fact are making the machinery less safe.
Wood Movement and Moisture Content
- Read Time: 4 mins
- Hits: 21294
One of the challenges that novice woodworkers soon discover it that working with wood means you need to understand it's properties, and one of the most rudimentary properties is the moisture content of wood.
Wood has the unique ability to absorb and release moisture. This is due to the cellular makeup of all types of wood, although different species of wood will absorb and release moisture at different rates. It is the coming and going of moisture that accounts for wood movement. If you were to grasp a handful of drinking straws in your hand, this is very similar to the structure wood. It is comprised of long microscopic tubes all bound together. It is these microscopic tubes that exchange nutrients up and down the tree as it is growing, and primarily moisture is gathered from the roots and distributed through the growth rings of the tree and on up into the leaves.
When a living tree is cut down, no matter what time of the year, there is always large moisture content in the tree, and a much higher one in the spring and summer. Depending on how the tree is milled, and how the wood is dried will also affect, to a degree, how that wood absorbs and releases moisture.
Making Raised Panels
- Read Time: 3 mins
- Hits: 18588
 Half the fun of making doors is deciding what kind of panel to use with them, and the list is endless. Once you have conquered making door frames or more specifically, cabinet door frames making the panels to go in them is often far less challenging. In our video we show how to make raised panels but this is only one of many possibilities. I have seen fabric panels, mirror panels, clear glass panels, stained glass panels and many varieties of simply plain panels of different specialty woods.
Making raised panels appeals to a large number of people because they are one of the "traditional" panels that are used in furniture and cabinet making, particularly kitchen cabinets. By mixing and matching wood some very striking alternatives are possible.
Making raised panels on a router is not difficult but there are some basic rules and techniques to follow. First and most importantly be sure to invest in a good quality panel cutting bit. Of course it will need to be carbide tipped but should also have the blade at a shear angle to make a better cut of the wood and to save wear and tear on your router. Freud bits are an excellent selection for raised panel bits.
Once you have decided on the type of wood you are going to use for the raised panels you will need to know 2 things, 1) what is the moisture content of the wood? and 2) what is the "wood movement" or wood expansion going to be for the wood and the environment that the cabinet will be in.
Bandsaw Setup and Tuning
- Read Time: 6 mins
- Hits: 29246
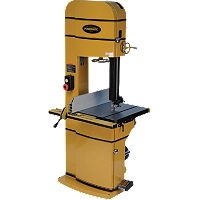
But band saws have one inherent problem, and that problem is that most of them will tend to "drift" when they are cutting through wood. What this means is that if you are ripping a piece of wood, and following a marked line, there is a very good chance your band saw will develop a mind of it's own and start cutting off that line. This drift is caused by a variety of elements like the grain of the wood, they type band saw blade you are using (and how sharp it is), the tension on the blade and even whether or not the blade is running true on the 2 band saw wheels. It is often possible to reduce drift but in most cases you have to learn which way your band saw will drift and take that into account when you are cutting wood.
Another inherent feature of all band saws, particularly when they are ripping wood, is that at the beginning of the cut the saw will cut quickly but as it is cutting through the wood the speed at which the wood is cut is noticeably slowed. Again this is typical of almost every band saw, small or large, so if you find this happening with your saw ... it is not "your saw" it is all saws that have this quirk.
Setting up a band saw is an important step in order to get the best cuts and help preserve the life of your blades and your saw. It is important that power to the saw be turned off before any setup is attempted. The first step is to set the BLADE TENSION, which, on most 2 wheel band saws is done by RAISING the top wheel with the appropriate adjustment knob or wheel on your band saw ....
Milwaukee M12 Cordless System Review
- Read Time: 3 mins
- Hits: 16802
Milwaukee Tools have been around for quite some time ... actually ... well over 100 years. Several years ago they were purchased by Techtronic Industries (TTI), who also own Ryobi, AEG, Homelite and others. The Milwaukee brand in the complex of businesses is considered to be the serious tool owners preference because of the high quality of Milwaukee tools.
If you get a chance to look at their website ... if the quality of their tools is anything like the high quality of their website you will be in for a treat of having a well made tool. Not only do they describe all their tools on the website (the same as everyone else) they ALSO provide excellent information on parts ... too bad others don't take this hint.
We tested some of the components of the M12 System which is their 12 volt cordless system, which consists of a drill, a driver, recip saw, rotary tool, inspection and camera viewers, lights, temperature measuring guns, a palm nailer, PVC shearing tool, a multi tool, and even a very cool radio/MP3 Player (that can withstand the rigors of a construction site).
The tools we looked at primarily were the drill and driver as we felt these would be among the most popular tools in the lineup. The 12 volt system is NOT for everyone. The power is ... well, 12 volts, which is great for driving smaller nuts and bolts and screws, or for drilling a smaller number of holes. The 12 volt system is not going to drill multiple holes though 2" fir beams if you happen to be running new power feeds from your 110 electrical panel. The 12 volt system is perfectly suited for smaller applications of drilling multiple smaller holes, or driving screws into a woodworking project. What we liked was that the 12 volt system is light but still packs enough punch to drive larger screws into Oak without any difficulty.
What was of particular interest is that these new tools are all using the same lithium ion battery system which recharges in something like 30 minutes.
Page 99 of 104