When I spotted the 2 electric motors at the garage sale, I passed over them at first. They were covered in dust, paint splatters and cobwebs and I doubted either worked. After a few minutes with no other finds, I was about to leave and asked the lady if the motors worked ... she did not know. I asked if I could plug them in, explaining that they might trip the electrical circuit, whereupon she said no, take them "as is" and gave me a lower price ... I told her that her price was too low, gave her more money and left with the 2 unknown condition motors ... neither of which I expected to work.
Watch it on Youtube: https://youtu.be/_yhYgfuoNGM
When I got them home and plugged them in, to my delight, they both worked. I was amazed. They were both only one-third horsepower, which I thought would be a bit low for making a disc sander, but if I made the disc size smaller, it might work ... so I went ahead with the plan.
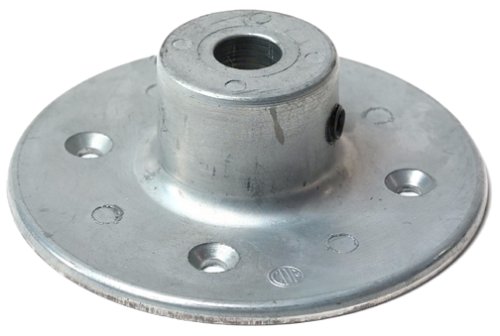
I did not want to spend my time trying to make an attachment for the motor. I wanted to get a "hub" that was a good quality that I could easily and firmly attach to the motors shaft, and my search ended on Amazon. I discovered that a company called Chicago Die Casting makes both half-inch (1/2") and they also make a five eights (5/8") hub that looks like this below.
View this item on Amazon for more info or to purchase
The first part of the build, now that I had both the major components, the hub, and the motor, found a good base on which to build it. I had some used 3/4" plywood that seemed to be the right size so I made my own motor stand-offs that would elevate the motor high enough that it would accommodate a 9-inch platter for the sanding disc. I decided ahead of time that with only a 1/3 HP, that 9 inches should be about the largest this motor would turn comfortably.
Once the motor was attached, I began making an adjustable "rest" for tools or wood or whatever I am going to want to sand. I made mine from 1/2" quality plywood and started off by making the 2 ends of the rest by carving an arch using my hand router. To do this I used a 1/4" Up-spiral bit and there happened to be an un-used screw hole in the base of my router that I could use as a pivot point, which turned out to be about equal to a 2-inch radius. After I cut both ends I enlarged pivot holes slightly, then left the drill bit in them and realigned the pieces together then drove a small nail through both so they would stay in place. The reason for this was to be able to trim both of these ends together on my table saw so they would be identical. Next, I made a couple of top pieces that would mount to the bottom ends and attached them with 1/4 bolts.
During the dry fit of the rest, I discovered that as you moved the top of the rest back and forth it moved OK, but it also moved closer and farther away from the where the sanding disc would be, so I determined that the whole "rest" piece would also have to move back and forth. To accomplish this, I used my same 1/4" spiral bit but this time on my router table and made some stop and start cuts that eventually cut a couple of slots in the base of my "rest".
Next, I used a couple of 1/4" hanger bolts and aligned them with slots I just cut so that the base could move back and forth on the base of the sander. With this done I could now attach the sides and the top. I ended up using epoxy glue for the top, I felt trying to drive screws into end grain 1/2" plywood is probably not going to last long term, so some solid pieces of wood were used to both brace and glue with.

Now that the rest was constructed and secure, next was to work on some sanding discs to attach to the hub. I had decided ahead of time to make a couple of different sizes, which turned out to be 6 inches in diameter and 9 inches in diameter. When I made these I made sure I marked the pivot point of each disc very well. I made some from good quality plywood and some from MDF melamine. In all cases, I checked discs after they were cut out and all were perfectly flat.
Choosing adhesive for the sanding platter can be a bit of a chore, there is some much to choose from. There is every imaginable grit, for wood or for metal and you can often get these in "PS" or "PSA" (that's Pressure Sensitive or sticky-backed, of Pressure Sensitive Adhesive - or sticky-backed).
I went to a local supplier and found that they had 6" and 8" in PS sandpapers but no 9" ... no matter, I can make my own, so I ended up getting a couple of sizes of PS grits that I can try out later on and also some good quality Freud Diablo Sanding sheets that I can coat myself.
I use Elmer's Spray adhesive, it's a general-purpose and seems to work well for anything I have tried it with, it's not super strong but I don't want that because I want something I can take on and off.
Read more or purchase Elmer's Glue on Amazon

I simply cut the sandpaper in a circle the sprayed the back with Elmer's glue, let it stand for 4 minutes then attached it to the plywood platter for the sander. The sandpaper stuck well and I was able to attach the platter and hub to the motor's shaft and lock the hub down with the set screw.
Now came the moment of truth ... to be honest, I was not that hopeful that the sander would have enough power, but it spun the disk up and when I applied some force in the form of a piece of wood, that little disc sander did a great job of sanding into the wood and taking off wood much better than I had expected.

So in the end, this turned out to be a much better disc sander than I had hoped for. Yes a 1/2 or 3/4 or even a 1 HP motor would be better, and then you could even move up to a 12" disc size, but for a small shop sander, this does a remarkably good job for what is probably a total cost of less than $50 .. and it's fun making it ..
Copyright Colin Knecht
woodworkweb.com


