I often wonder how many other people spend the same amount of time that I do in making "things" in my workshop work better. I see SO MANY things that could have been easily made better or more convenient at the factory where they were made, or at the very least, made less frustrating to use ...
Workshop Tips and Tricks #34
but now I am tasked with making those alterations and adjustments myself. And in some rare cases, other manufacturers that make the SAME tool of the appliance, see the same things and remake the new tools better ... I love that !!
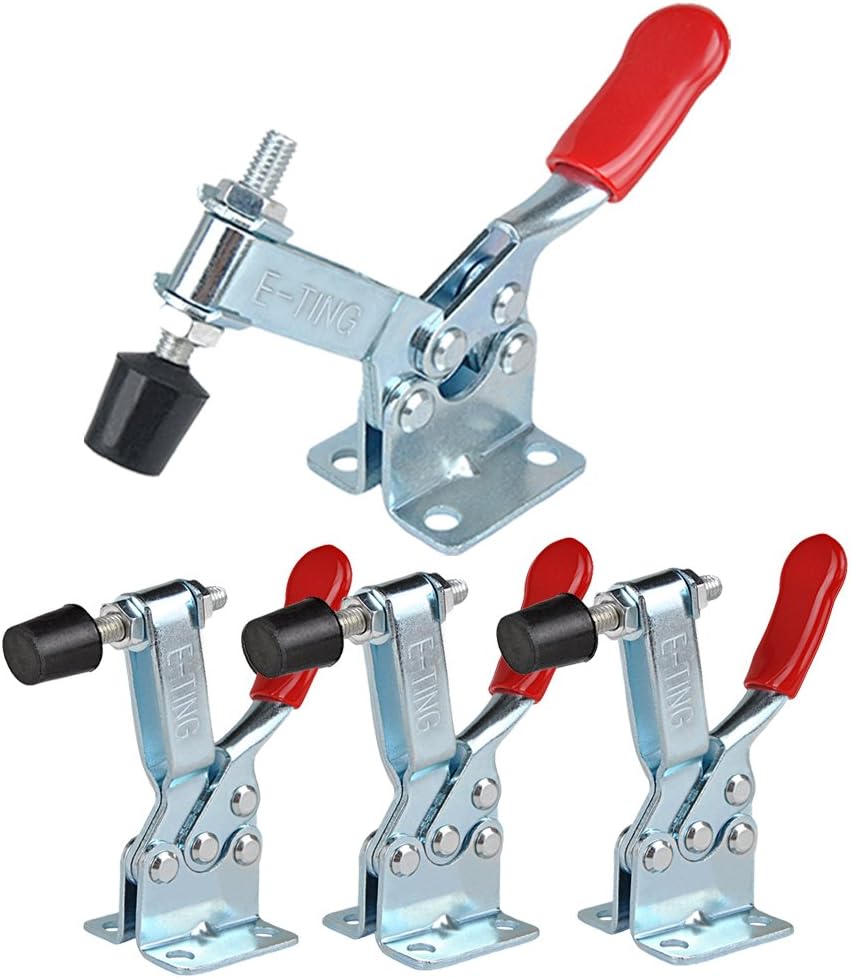
And so, right out of the gate, I am a big fan of these toggle clamps. They are reasonably inexpensive, work well, and seem to last a long time, and I can often move them from one tool to another so get multiple uses from them ...
I always seem to be adjusting the clamping rubber stud either up or down because the wood I am using is thinner or thicker, depending on the jig or what is being held. Sometimes I can tighten them enough by hand, but when the clamp is holding something that needs to go through a saw or spinning bit, then those studs need to tighten better than finger tight on a bolt thread. Here is where a wing nut and lock washer would make a huge difference, and that's exactly what I have done.
Most of these clamps, at least the ones I seem to get, all come with metric thread ... which is fine, except for the life of me, I cannot find metric wingnuts anywhere in the area where I live and I refuse to spend huge amounts of time looking for them when I can much more easily re-make the stud using any variety of hold down parts from a trimmed electrical marret to a premade tiny rubber stopper and now I can use National thread bold, cut off the head and for it into the stopper part and now I can easily attach wingnuts that are easily found that problem is fixed.

Below is a listing on the Woodworkweb Amazon store for Toggle clamps in 1, 2 or 4 pack sizes
Check size of clamp, search for sizes if needed
Sometimes I can go weeks without using my metal vice, other times it seems I need it every other day to better hold the metal parts I am working on. Most of you have seen how I can easily move it on top of my wood vice, but few of you have seen what I add to the jaws of the vice so I don't damage wood or even some metal parts that need firm clamping and I don't want to mar the finish. This involves putting on some pipe insulation that is very inexpensive from most hardware stores, works very well, and reusable over and over.

Someone asked me if clamping a steel square to a table saw blade was a bad idea, so they could better check "squareness". My response was, yes you can do that but be careful you don't bump or bang any or the carbide teeth on the blade. Steel is the enemy of carbide (which has similar properties to crystal, meaning it will easily chip or crack when subjected to even minor bumping or banging with certain metals). What I discovered, to my dismay, was that the table saw blade I had "squared" a few days ago, that is made it 90 degrees square to the table, was actually off a couple of degrees. Not good.
I carefully attached my steel square to the blade making certain I was between carbide teeth, then clamped it there with a quick-release clamp. When I shined a light on the bottom of the square, I could easily see light coming from under the square. Easily fixed my a minor adjustment to the angle of the blade. Now I know to better check this and if in doubt, I will use the quick method the check to make sure the blade is perfectly set.

If you still haven't managed to pick yourself up a good quality steel square, here is a listing at the Woodworkweb
Affiliate store for Taylor Tools - this is a 4" x 6-1/4" square
Click the link to view the square, and browse other Taylor Tool items
Here's a nice easy way of making a jig to trim glued boards that are uneven on both ends, as glued boards often are. find some flat plywood or even some MDF material and attach a strip of wood along one end. At right angles to that board, using a carpenter's square for example, carefully attach another strip along one side. In the photo below, the second strip is attached along the bottom of the jig and is at a perfect 90-degree location to the side attached board.
Now you can lay your wood down on the table saw, but the jig up to the bottom and right side, then use an "F" clamp or similar to keep the jig secured to the board you are cutting and easily cut that off on your table saw. Now you have both a bottom and the left side of your board both trimmed to 90 degrees, the other 2 sides can now be easily trimmed making a perfectly cut board, parallel and 90 degrees at each corner.

And while still speaking of glued boards ... I have only used this trick on a couple of occasions, but it works really well. If you even are gluing boards together and you are not certain whether or not you will need to break that glue joint, what you can do is glue both sides of the board with a thin piece of paper between them. I have only done this a couple of times, but both times this trick worked excellently. It does, probably give you a slightly less strong joint, but in many cases, this is not an issue anyway, and if you ever need to take those boards apart, a chisel in one end right at the paper line, a bump with a mallet and the boards pop apart, or at least they easily did for me and all I used was newspaper between the boards.

And finally ... a safer way to cut small pieces on a chop or sliding miter saw. Cutting small pieces is always a danger you can help reduce that danger by first, making sure there is a good backing for the wood, where the fence of the miter saw is supporting the wood well, next ... keep your hands back by using a 2 prong holding stick that you can easily make using "Wheel Stems", which of course are rubberized so bottoms tend to grip the wood and best of all, holding the wood firmly and keeping your hands back is a much safer way or cutting smaller pieces of wood.

These are just a few of the things I use around my shop ... if you have other ideas that you use, send them to me in an email and if I haven't already used them in a previous video, I will try to include them in a future episode ...
Copyright Colin Knecht
woodworkweb


